Securely And Directly Connect Raspberry Pi IP Address: A Comprehensive Guide
So, you’ve got your shiny new Raspberry Pi, and now you’re ready to take control of it from anywhere in your network—or maybe even beyond. But how do you securely and directly connect Raspberry Pi IP address without exposing yourself to potential security risks? Let’s dive into this exciting world of tinkering, networking, and securing your device like a pro.
Let’s face it—Raspberry Pi is more than just a tiny computer; it’s a gateway to endless possibilities. Whether you're setting up a home automation system, running a media center, or even creating your own personal server, connecting to your Raspberry Pi securely is crucial. And yeah, I get it—nobody wants their little Pi to become an open door for hackers.
In this guide, we’ll explore everything you need to know about securely and directly connecting your Raspberry Pi’s IP address. From understanding the basics of IP addresses to advanced security measures, we’ve got you covered. So grab your coffee, sit back, and let’s get started!
- Meet Francesca Chiri The Rising Star Whorsquos Capturing Hearts
- Tim Burtons Exwife Unveiling The Untold Stories And Mysteries
Here's a quick breakdown of what we’ll cover:
- Understanding IP Addresses and Raspberry Pi
- Finding Your Raspberry Pi IP Address
- Securing Your Connection
- Using SSH for Remote Access
- Setting Up a Static IP Address
- Network Considerations
- Implementing Firewall Rules
- Using a VPN for Extra Security
- Troubleshooting Common Issues
- Conclusion and Final Thoughts
Understanding IP Addresses and Raspberry Pi
First things first—what exactly is an IP address, and why does it matter for your Raspberry Pi? Think of an IP address as the digital equivalent of your home address. Just like how mail carriers need your physical address to deliver packages, devices on a network need IP addresses to communicate with each other.
Your Raspberry Pi, when connected to a network, gets assigned an IP address automatically by your router. This address can either be dynamic (changing every time your Pi reconnects to the network) or static (fixed and unchanging). For most projects, having a static IP address is ideal because it ensures consistency and reliability.
- Brandi Carliles Personal Life An Unfiltered Glimpse Into Her World
- Bruce Springsteen Wives The Love Stories Behind The Boss
Why Is It Important to Securely Connect Raspberry Pi IP Address?
Alright, here’s the deal: while IP addresses are essential for communication, they can also pose security risks if not handled properly. Exposing your Raspberry Pi to the internet without proper protection is like leaving your front door wide open—anyone could walk in.
By learning how to securely and directly connect Raspberry Pi IP address, you’re essentially putting a lock on that door. This ensures that only authorized users can access your device, keeping your data and projects safe from prying eyes.
Finding Your Raspberry Pi IP Address
Now that we understand the importance of IP addresses, let’s talk about how to find your Raspberry Pi’s IP address. This step is crucial before you can start connecting to it remotely.
There are several ways to discover your Pi’s IP address:
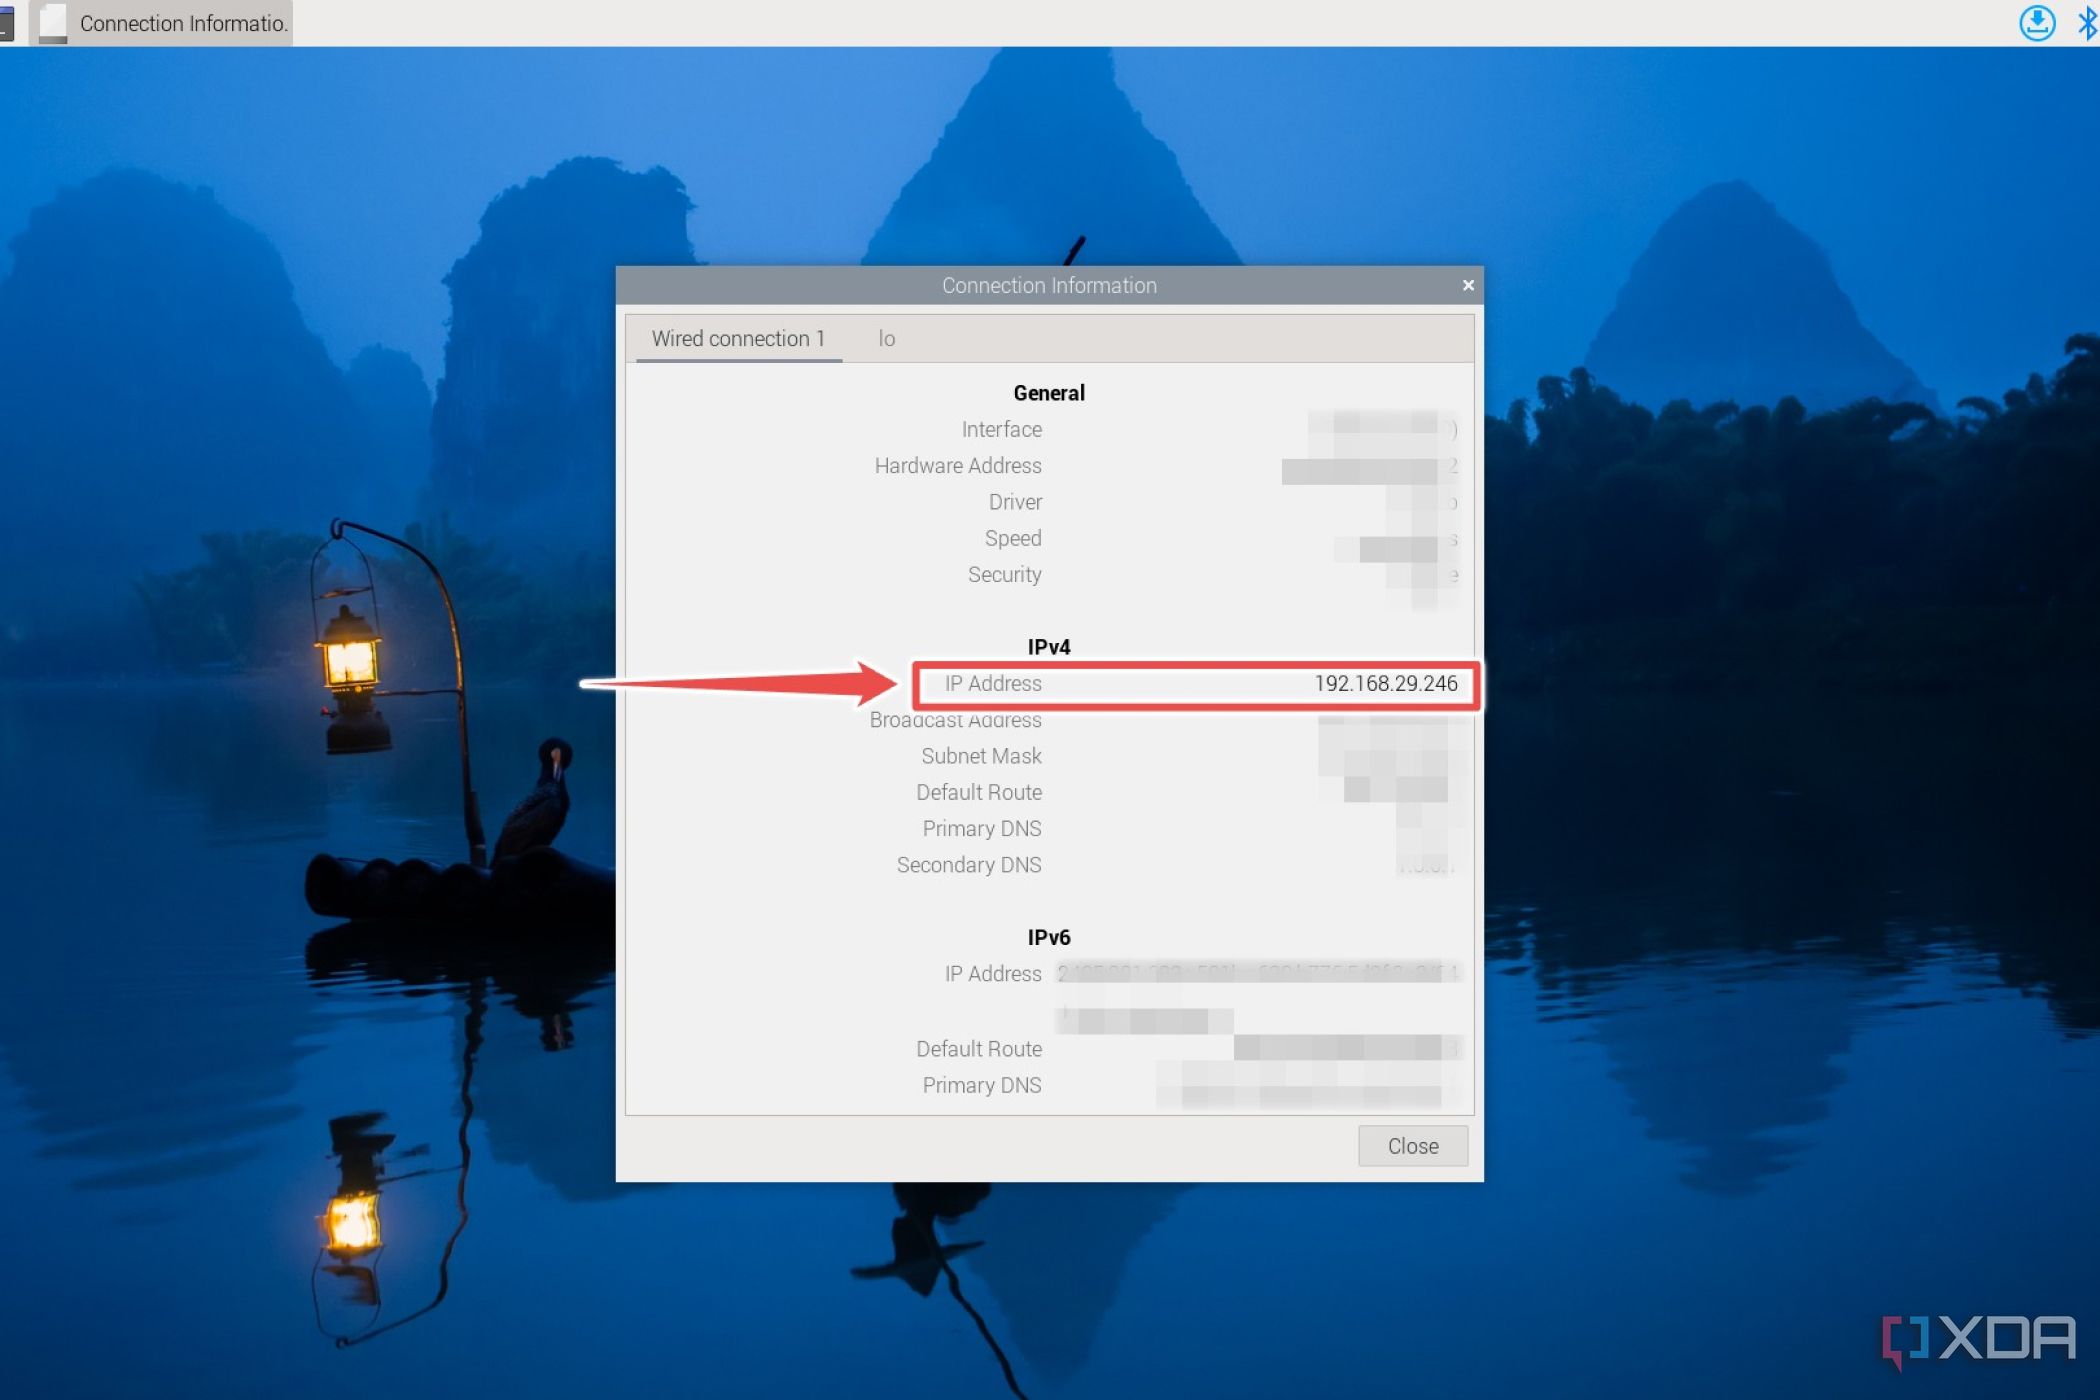
- Using the Command Line: Open a terminal on your Raspberry Pi and type
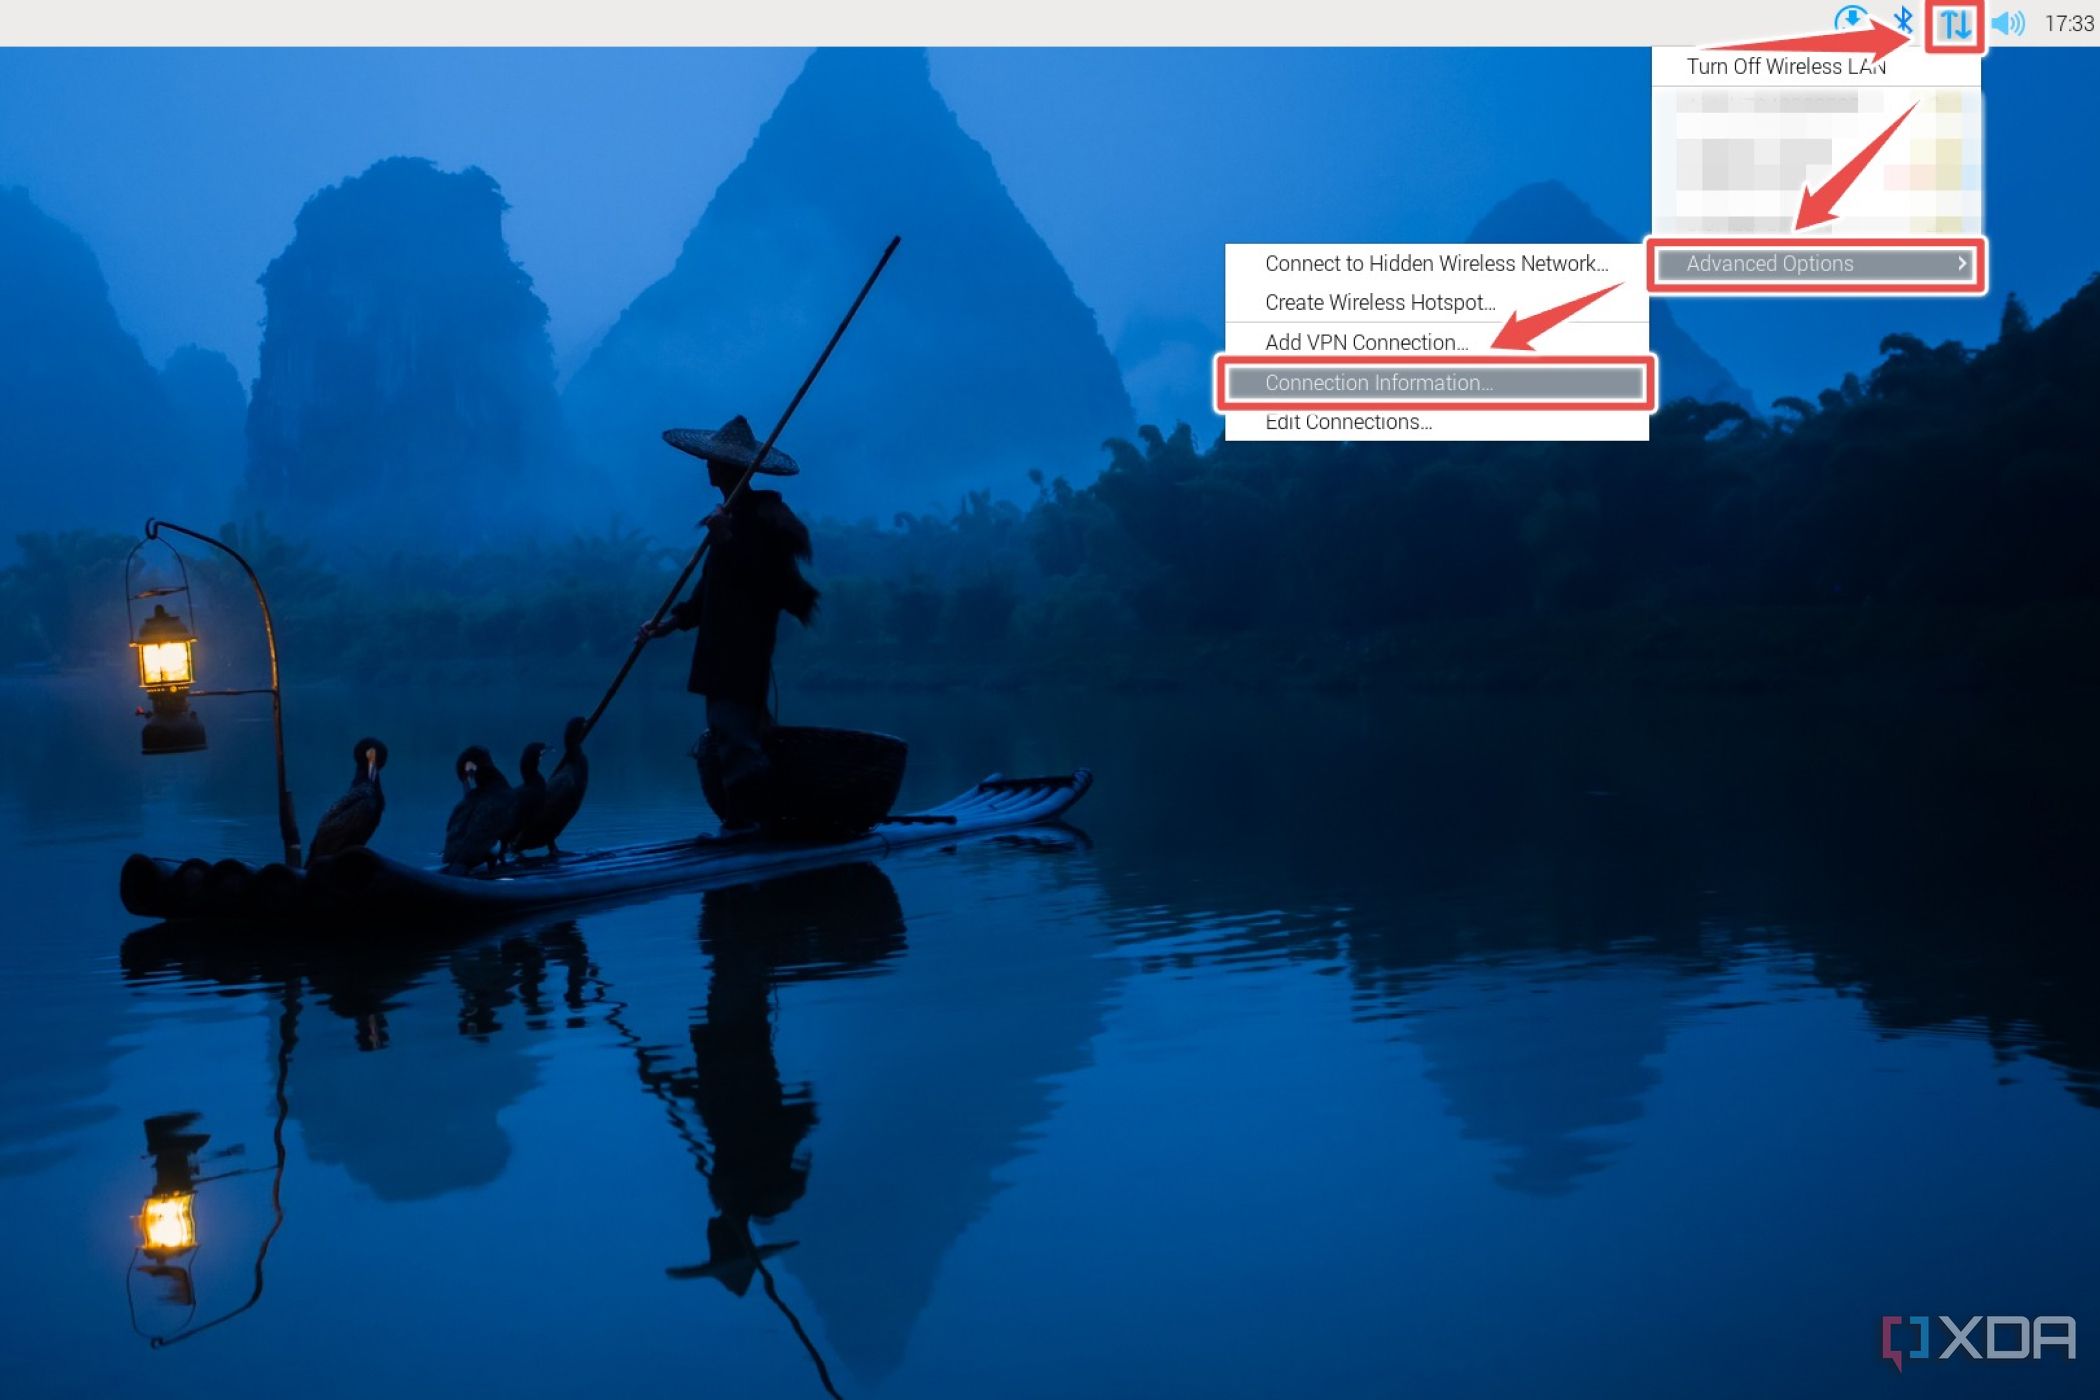
hostname -I. This will display its current IP address. - Checking Your Router: Most routers have a web interface where you can view all connected devices and their corresponding IP addresses.
- Using Advanced IP Scanner: Tools like Advanced IP Scanner can help you identify all devices on your network, including your Raspberry Pi.
Once you’ve found your Pi’s IP address, jot it down—you’ll need it for the next steps.
Securing Your Connection
Alright, so you’ve got your Raspberry Pi’s IP address. But hold up—before you start connecting to it, let’s talk about security. Securing your connection is one of the most important aspects of working with Raspberry Pi, especially if you plan to access it remotely.
Here are some key steps to ensure your connection remains safe:
- Change Default Credentials: Never leave your Raspberry Pi with the default username (pi) and password (raspberry). Update these immediately to something unique and strong.
- Enable Two-Factor Authentication: Consider setting up two-factor authentication for an extra layer of security.
- Use Strong Passwords: Make sure your passwords are complex and include a mix of letters, numbers, and symbols.
Why Security Matters When Connecting Raspberry Pi IP Address
Imagine this scenario: you’ve set up a cool home automation system using your Raspberry Pi. But what happens if someone gains unauthorized access? They could potentially control your lights, cameras, or even worse—your personal data. That’s why securing your connection isn’t just a good idea—it’s a necessity.
Using SSH for Remote Access
One of the most common ways to connect to your Raspberry Pi is through SSH (Secure Shell). SSH allows you to access your Pi’s command line interface remotely, making it incredibly useful for managing your device without needing a monitor or keyboard.
Here’s how to set up SSH on your Raspberry Pi:
- Enable SSH in the Raspberry Pi Configuration tool.
- Use an SSH client like PuTTY (for Windows) or Terminal (for macOS/Linux) to connect to your Pi’s IP address.
- Enter your login credentials when prompted.
And just like that, you’re connected! But remember—always ensure your SSH connection is encrypted and secure.
Setting Up a Static IP Address
As mentioned earlier, having a static IP address is often preferred for Raspberry Pi projects. A static IP ensures that your Pi always has the same address, making it easier to connect to and manage.
To set up a static IP address:
- Open the
/etc/dhcpcd.conffile in a text editor. - Add the following lines, replacing the placeholders with your network details:
interface eth0static ip_address=192.168.1.100/24static routers=192.168.1.1static domain_name_servers=192.168.1.1
- Save the file and reboot your Raspberry Pi.
Voilà! Your Raspberry Pi now has a static IP address.
Network Considerations
When working with Raspberry Pi, it’s important to consider your network setup. Factors like bandwidth, latency, and firewall settings can all impact your ability to connect to your Pi’s IP address.
Here are a few tips to optimize your network:
- Use Ethernet Whenever Possible: Wi-Fi is convenient, but Ethernet provides faster and more reliable connections.
- Check Your Router Settings: Ensure that your router is configured correctly and that there are no conflicting IP addresses.
- Monitor Bandwidth Usage: If you’re running bandwidth-intensive applications on your Pi, make sure your network can handle the load.
Tips for Optimizing Network Performance
Optimizing your network not only improves connectivity but also enhances the overall performance of your Raspberry Pi projects. Consider upgrading your router, using Quality of Service (QoS) settings, or even setting up a dedicated subnet for your Pi.
Implementing Firewall Rules
Firewalls are a vital part of any security strategy, and your Raspberry Pi is no exception. By implementing firewall rules, you can control which ports and services are accessible from outside your network.
Here’s how to set up a basic firewall on your Raspberry Pi:
- Install
ufw(Uncomplicated Firewall) usingsudo apt install ufw. - Allow SSH access by typing
sudo ufw allow ssh. - Enable the firewall with
sudo ufw enable.
With these rules in place, your Raspberry Pi is now protected against unauthorized access.
Using a VPN for Extra Security
If you’re planning to access your Raspberry Pi from outside your local network, consider using a VPN (Virtual Private Network). A VPN encrypts your connection, making it much harder for anyone to intercept your data.
Here’s how to set up a VPN on your Raspberry Pi:
- Choose a reputable VPN provider and download their client software.
- Install the software on your Raspberry Pi and configure it according to the provider’s instructions.
- Connect to the VPN whenever you need to access your Pi remotely.
By combining SSH with a VPN, you create a nearly impenetrable barrier against potential threats.
Troubleshooting Common Issues
No matter how careful you are, issues can still arise when working with Raspberry Pi. Here are some common problems and how to fix them:
- Can’t Connect via SSH: Double-check your IP address, ensure SSH is enabled, and verify your firewall settings.
- Dynamic IP Address Issues: If your Pi’s IP keeps changing, consider setting up a static IP address.
- Slow Connection Speeds: Check your network setup, upgrade your router if necessary, and ensure your Pi is connected via Ethernet.
Don’t let these issues discourage you—troubleshooting is all part of the learning process!
Conclusion and Final Thoughts
And there you have it—a comprehensive guide to securely and directly connect Raspberry Pi IP address. By following the steps outlined in this article, you can ensure that your Raspberry Pi remains both accessible and protected.
Remember, security is an ongoing process. Stay vigilant, keep your software up to date, and don’t hesitate to explore new tools and techniques to enhance your setup.
Now it’s your turn! Have you successfully connected to your Raspberry Pi’s IP address? Share your experiences in the comments below, and don’t forget to check out our other articles for more Raspberry Pi tips and tricks. Happy tinkering!

Detail Author:
- Name : Zula Bechtelar
- Username : cory41
- Email : jamarcus15@reichert.org
- Birthdate : 1986-03-26
- Address : 257 Letha Roads Gudrunfort, NH 83390-1040
- Phone : (820) 848-9018
- Company : Green-Bode
- Job : Aviation Inspector
- Bio : Impedit et itaque tempore deleniti velit ut. Unde et velit rerum nam. Consequatur et suscipit et excepturi. Est omnis earum tempore et et dicta sint. Suscipit minima et est autem itaque.
Socials
linkedin:
- url : https://linkedin.com/in/amani_dev
- username : amani_dev
- bio : Hic ducimus in voluptate.
- followers : 3769
- following : 342
tiktok:
- url : https://tiktok.com/@amani.kozey
- username : amani.kozey
- bio : Maiores alias nesciunt non. Aut et autem quia dolorum.
- followers : 6654
- following : 308
instagram:
- url : https://instagram.com/amani915
- username : amani915
- bio : Molestiae nihil ratione et et. Modi ea autem voluptas corporis necessitatibus et ab.
- followers : 4735
- following : 1777
twitter:
- url : https://twitter.com/akozey
- username : akozey
- bio : Qui numquam et libero aliquam quaerat. Dolores laborum excepturi reiciendis et. Fugiat sint perferendis commodi ut excepturi magni.
- followers : 2347
- following : 798
